
Printmaking Article |
How to Make a Collagraph Print By Rachel Edwards Collagraph is simply making a print of a collage.1 This process is relatively simple and can be enjoyed by virtually every age group.1 Collagraph printing is an inexpensive technique.4 This process is often simplistic and repetitive, thus challenging the artist’s creativity by making him or her think outside the box when selecting materials.4 Color and texture are key in making an effective print.4 |
|---|
| Step 1: Topic |
The initial design of a print is very important, because great art does not simply happen. Therefore, brainstorm different ideas is crucial in making a print.1 Your first idea is probably not going to be your best idea, instead the fourth or fifth idea probably will be. Talking with fellow artists and get their feed back on your ideas is also a good starting point to coming up with a brilliant idea. |
| Step 2: Materials |
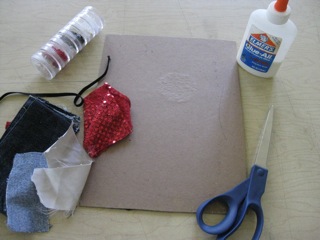 Once you have an idea you can begin gathering materials that will create your print. You will need to make a plate; a stiff piece of cardboard will work. Masonite, matboard, or thin metal are other options.4 Also, a 4-6mm piece of thin wood can be used as a plate.2 Liquid glue or hot glue can be used to attach materials to the plate.5 Stationary weight or card stock work best for printing on, and the color is a preferance.5 Printing ink, acrylic, or water based paint are the most common paint options. Other materials you may want are: newspaper, scissors, paper towel, and a paintbrush. Lastly you will need a printing press. If you do not have a printing press a brayer or rolling pin will work, however, the press works best.5 Once you have an idea you can begin gathering materials that will create your print. You will need to make a plate; a stiff piece of cardboard will work. Masonite, matboard, or thin metal are other options.4 Also, a 4-6mm piece of thin wood can be used as a plate.2 Liquid glue or hot glue can be used to attach materials to the plate.5 Stationary weight or card stock work best for printing on, and the color is a preferance.5 Printing ink, acrylic, or water based paint are the most common paint options. Other materials you may want are: newspaper, scissors, paper towel, and a paintbrush. Lastly you will need a printing press. If you do not have a printing press a brayer or rolling pin will work, however, the press works best.5The materials put on the plate are up to the artist. However, keep in mind that the materials should not be too thick (can tear the paper) or have sharp edges (can ruin the press).2 Almost any material will work as long as it is no higher then 1/8 inch.5 Some ideas to get you started are: fabric, lace, rope, leaves, rice and other house hold items. Remember, the more variety of texture on your plate the better it will turn out.2 |
| Step 3: Preparing the Plate |
Cut the plate to the size you want your print to be.5 If you are using a rolling pin or brayer the process will be difficult if it is bigger then 10”x10”.5 If a press is being used then the plate can be as large as the press can handle.5 |
| Step 4: Layout the Design and Gluing |
|
| Step 5: Inking the Plate |
|
| Step 6: The Press |
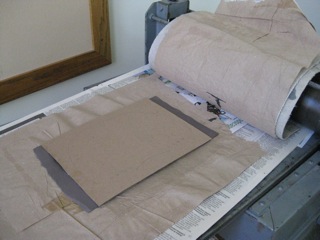 If you are using a press: the press is the best method, but be sure to do a test print to make sure the pressure is adjusted correctly.5 The press should have two pieces of felt, which should be the outer layers of this “sandwich”. Next to the felts should be plain news print (to keep felts clean) and between those should be your damp paper with your plate on top.3 If you did not want to use news print, newspaper touching the felt and paper towel directly on top of and under the damp paper and plate (the paper towel is used to keep words and images from the news papers off your paper). The press is the best method, but be sure to do a test print to make sure the pressure is adjusted correctly.5 If you are using a press: the press is the best method, but be sure to do a test print to make sure the pressure is adjusted correctly.5 The press should have two pieces of felt, which should be the outer layers of this “sandwich”. Next to the felts should be plain news print (to keep felts clean) and between those should be your damp paper with your plate on top.3 If you did not want to use news print, newspaper touching the felt and paper towel directly on top of and under the damp paper and plate (the paper towel is used to keep words and images from the news papers off your paper). The press is the best method, but be sure to do a test print to make sure the pressure is adjusted correctly.5If you are using a rolling pin or brayer: be sure to apply even pressure and only make a few passes (the more passes you make the more likely the plate will move and cause a blurry print).5 |
| Step 7: Drying and Trimming |
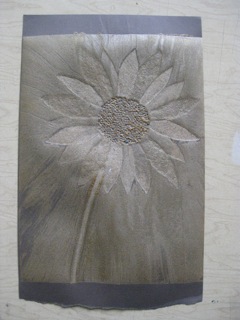 Allow the print time to dry out thoroughly, a drying rack is preferable, however a table where it will not be touched will work.5 When the paper is completely dry trim the edges to the desired size.5 Allow the print time to dry out thoroughly, a drying rack is preferable, however a table where it will not be touched will work.5 When the paper is completely dry trim the edges to the desired size.5 |
| References |
1 Basso, Robert. "Collagraphy." Arts & Activities 118.3 (1995): 16. |
 Arrange the materials as desired then securely glue each piece to the plate. If hot glue is used wait a few minutes for it to dry before printing, however white glue may take a few hours; either way be sure the plate is completely dry before printing.5 Some find it helpful to paint a coat of gesso, fast drying spray, or lacquer over the entire board as a sealer.3 Acrylic medium or varnish are other ways of preserving and sealing the plate.2 It is useful to use a sealer if you intend to use different colors and want to wash your plate however if you are only using one color or want to mix the colors it is not necessary to use a sealer. Note: the print will come out in reverse to the plate, this is especially important if you choose to use words.
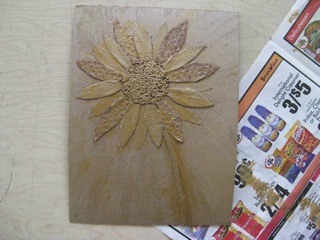 Start by getting the paper wet and setting it on a table to dry a little. Dab an even coat of paint or ink on the plate by using a paintbrush or wadded up paper towel; be carful not to brush it on because it can damage materials on your plate.5 Also, be sure to get ink in every crevice and crack on the plate.3 By the time the plate is all inked up the paper should be medium wet. If it is not, a clean piece of paper towel can be used to dab some of the water off. Ink can be re-applied to the plates and ran through the press as many times as desired.3